Since YouTube launched in 2005, videos have become an important part of many marketing strategies, especially when it comes to gaining and retaining customers. We know that recording training videos take time and effort, particularly when you’re just getting started.
Fortunately, there is a solution: Zoom, a teleconferencing software with simple video recording capabilities. This tutorial will show you how to create a video presentation using Zoom’s video recording feature.
First, let us examine the importance of video content for membership businesses.
Why Use Videos for your course
Videos are a unique tool that you can use to show and explain to your customers exactly how to do something. It’s an engaging and educational way to get your point across. As a result, videos are great for tutorials, demonstrations, and training videos for helping your customers use a product or service or assisting them with technical aspects.
Below are additional benefits of using videos for your courses:
Videos are more appealing

Training videos are an engaging way to present your ideas. They allow you to use audio, visual, and kinetic elements to engage learners. Consequently, these different elements of videos make them much more memorable than still images or text.
Videos also encourage the viewer to think, problem-solve, and be creative. As a result, it enhances the cognitive processes that are essential to learning.
Processes are best illustrated with training videos
The best way to create an excellent learning experience is through training videos.
Training videos bring your message to life, from step-by-step processes to demonstrations of using a product. Videos allow your audience to refer back to different parts of the course at any time, thereby enhancing their learning experience.
Are you looking for inspiration for your online course? Read our article Ways To Confidently Share Your Expertise and Earn Money to get ideas for your own knowledge business.
Videos are great for social media sharing
A long block of text is not appealing to anyone. In the other words, it’s much harder to convince a customer to click through to another page if your content is text-heavy and boring.
Moreover, videos appeal to the auditory senses and contain visual elements that connect to users’ feelings and emotions. You do not need an expensive video studio to create high-quality course videos.
You can record beautiful and compelling videos that your audience will love with a few inexpensive tools!
Let’s talk about how you can create engaging videos without breaking the bank.
Prepare Your Background
Film yourself best against a clean, simple background so that your viewers are not distracted by other things on the screen. But, you also have the option of using a virtual background for your Zoom training videos to make them look more professional. Here is how:
Set up your green screen background
To prevent your video from looking choppy and flickering when using a virtual background. Certainly, it’s best to set up a green screen. This will help Zoom distinguish you from your background and prevent your video from looking jerky and flickering.
Do not worry; it’s not really complicated to set up. Here’s how to do it:
Hang a green matt fabric of your choice as your background therefore, make sure that the fabric is not wrinkled because any wrinkle in the fabric will ruin the quality of your video.
Lighting
Light can dramatically affect the quality of your video, so it’s important to pay attention to this detail. Here are some tips for improving lighting:
Find a room in your home where natural light is at its best. Look for indirect sunlight that reflects off the walls and creates soft illumination. This is the best way to achieve professional lighting without investing in expensive equipment.
Lighting is all about finding the right balance of light and shadow to create a natural, appealing scene. Natural light is best, but if you do not have a suitable window, and, use indirect light from lamps or overhead spotlights that reflect off the walls and create a more diffused effect.
Remember, the brighter your room, the softer your light needs to be. Setting up lamps can be a tricky business. One simple option is to use sheets of white paper as reflectors, which allow you to position the lamps where they are needed without investing in heavy equipment.
Finally, whatever direction your camera’s lens faces, make sure there isn’t any glare. Glare on the camera lens will make your video look washed out and blurry, which is certainly not what you want to achieve.
Choose a High-Quality Mic
Want to make your videos stand out? A microphone is essential for quality audio and should not be overlooked. As a result, some rely on the built-in microphone on their laptop or smartphone, but if you’re investing your time in the video, we suggest putting some money into a quality microphone.
It will pay for itself as your channel grows.
How to Record your Training Videos with Zoom for Free

Therefore, now that you have your green screen background, lighting, and microphone setup, you can start recording your video course.
Step 1: Register
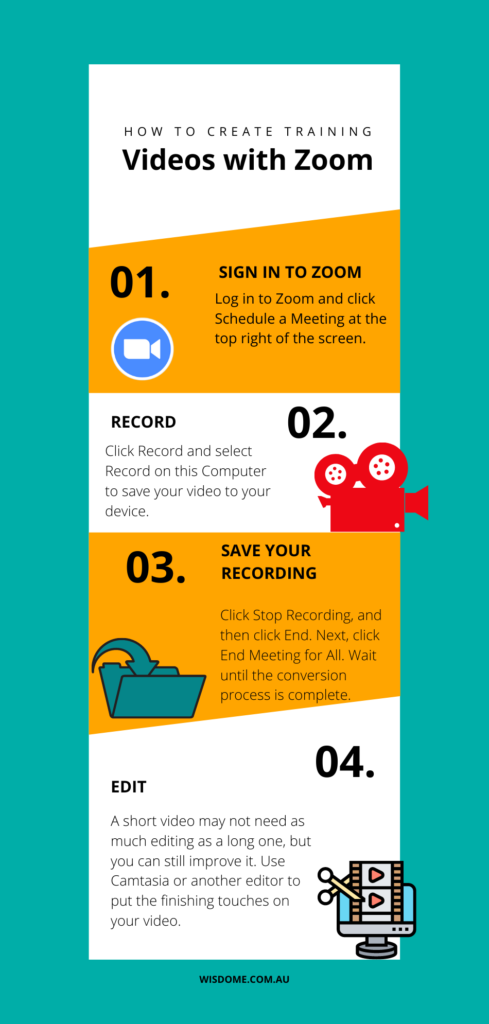
Click the Sign Up button on Zoom’s homepage to create your account. And, a free business account is ideal for audio and video chats that last up to 40 minutes – perfect for short videos you’ll be making.
Step 2: Setup virtual background

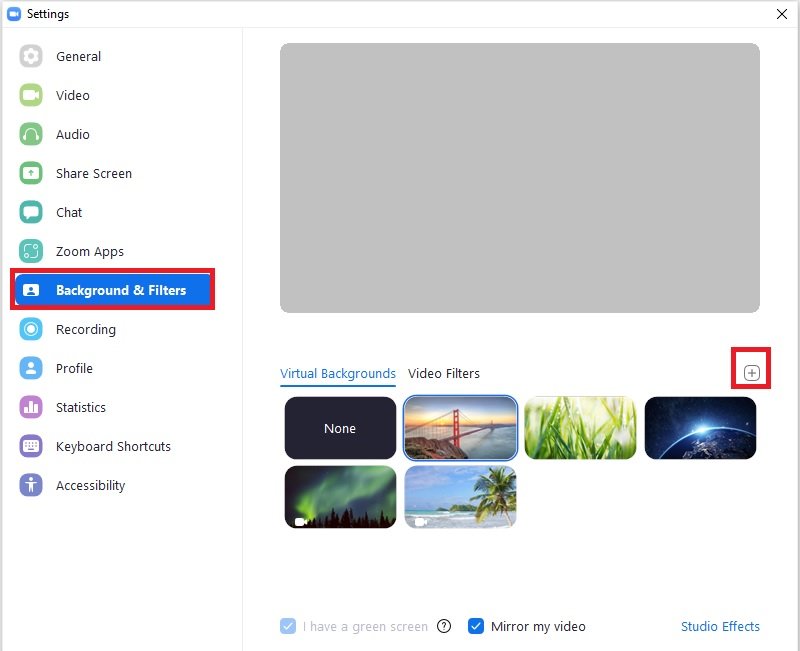
Log in to Zoom Desktop Client. Click the Settings icon in the upper right corner. Select Background & Filters and choose one of the default backgrounds.
If you want to add your own image or video as a virtual background, simply click the + icon to upload it from your computer. You can find more free Zoom background images at Pexels.com.
Finally, once you’re done changing your virtual background, close the Setting menu by clicking the X button in the upper right corner.
Step 3: Schedule a Meeting

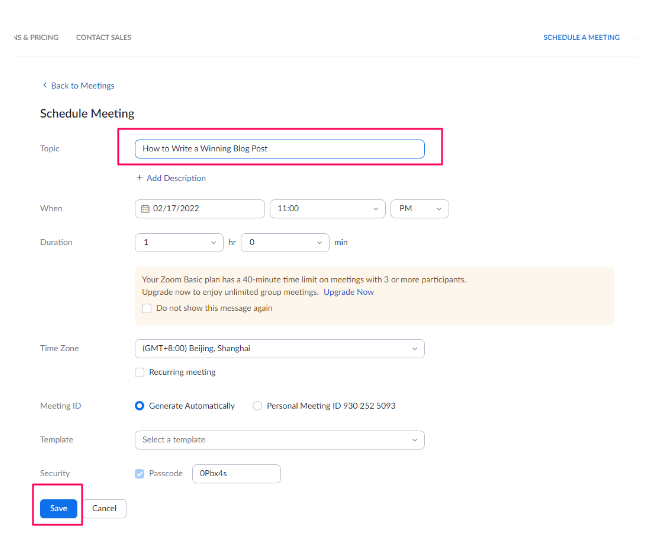
Log in to the Zoom web portal and click Schedule a Meeting in the upper right corner. Next enter the name of your video and click Save. Click Start in the lower-left corner of the page. Wait for Zoom to display your virtual meeting room.
4. Record

Click Record and select Record on this Computer to save the training video to your device.
Feel free to use the Share Screen option at any time to capture your screen as you go through your presentation for example, a presentation prepared in PowerPoint or Canva.
Note: You can pause your recording at any time by clicking Pause in the menu options at the bottom right.
5. Save your work

When you’re finished recording, click Stop Recording and then click End. Then, click Stop Meeting for All.
Wait until the conversion process is complete. Then open the file in its location. If you did not select a destination folder at the beginning, you could usually find your file in the Downloads folder on your computer.
6. Review and edit
A short video may not need as much editing as a long one, but you can still improve it. Moreover, use Camtasia or another editor to put the finishing touches on your video.
Next week, we will discuss other budget-friendly ways to shoot videos. And, we will also talk about editing your videos and creating beautiful thumbnails. Check back next week for more information.


